CHAPTER 1
Creating a Plan
"Odekake Note" offers 5 ways to create a plan. Switching between them to fit your purpose and situation covers everything from a spontaneous outing to a trip you want to plan carefully in advance.
5 ways to create a plan
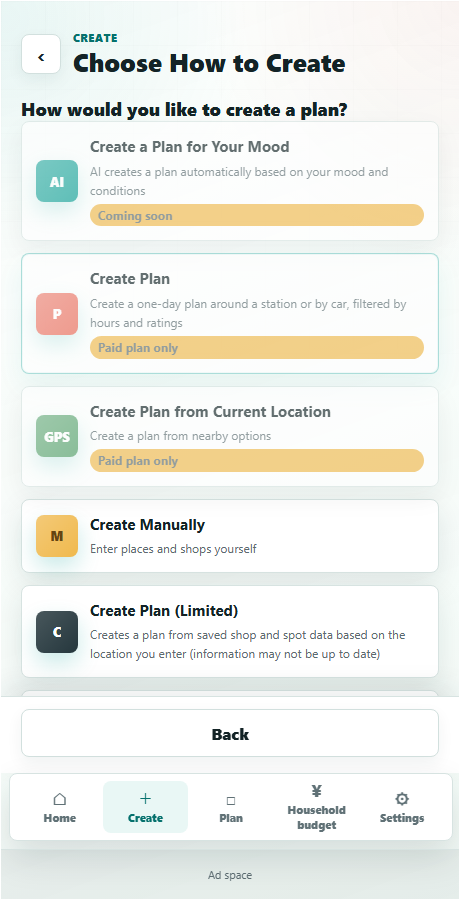
Opening the "Create" tab lets you choose from the 5 methods below, each suited to different situations.
- Create your own plan:Build a plan by entering every location and time yourself. Good for when you already know the shops or spots you want to visit, or when you want to carefully plan a multi-day trip. Available on the Free Plan.
- Create a plan (limited):Quickly assemble a plan on the spot from pre-loaded candidate data. Works even in areas with poor connectivity, so it also supports offline use. Available on the Free Plan.
- Create a plan from your current locationPaid Plan only:Searches for restaurant, cafe, and sightseeing spot candidates around where you are now to build a plan. Good for a spur-of-the-moment outing when you want to "find something nearby."
- Create a plan (by station/car)Paid Plan only:Specify a station or area as your starting point, and build a plan from candidates reachable by public transit or car. Good for day trips and longer outings.
- Create a plan from your mood (AI)Coming soon:AI suggests a plan based on the mood or theme you enter. This feature is currently in preparation, so this screen shows "Coming soon" and cannot actually be used yet.
If you're not sure which to choose, try "Create a plan (limited)" first — it's an easy way to get a feel for how the app works overall.
Entering basic conditions
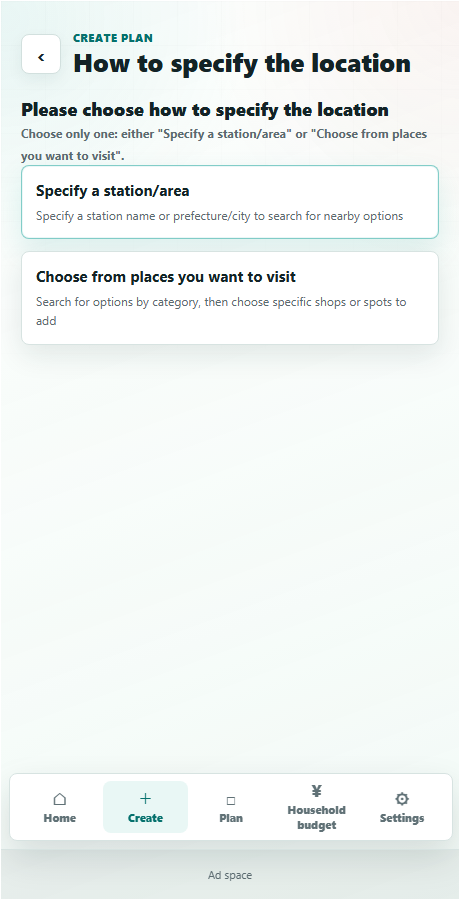
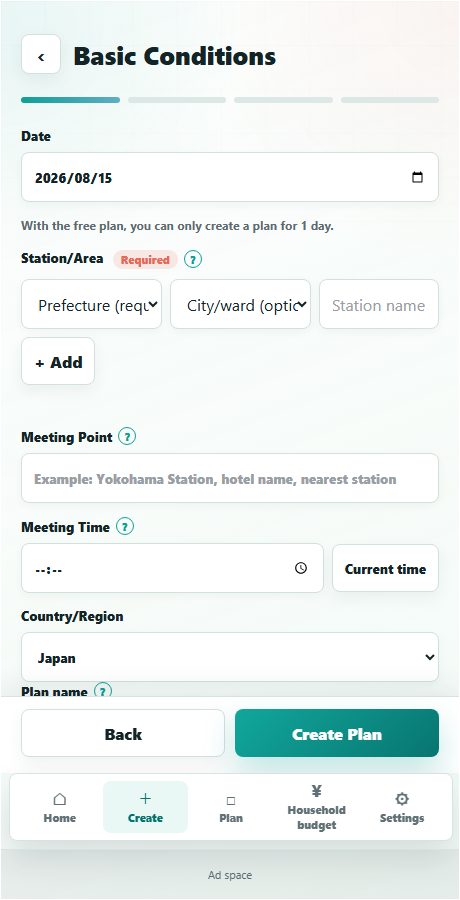
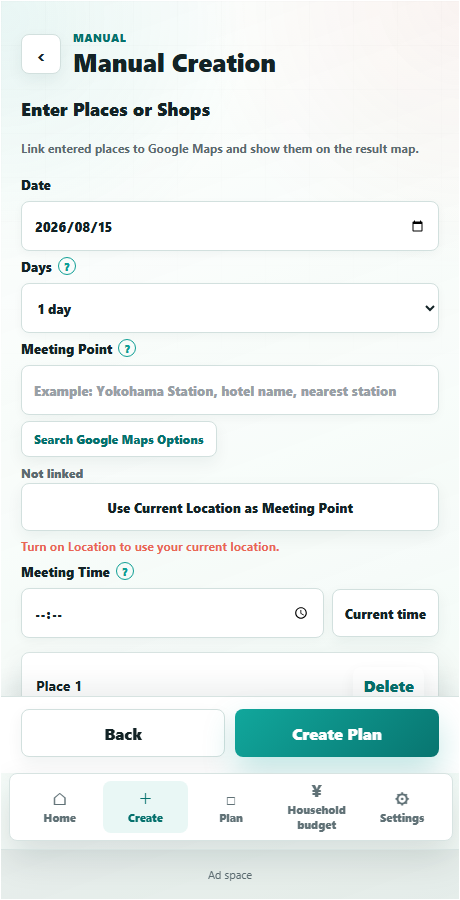
After choosing a creation method, you enter basic conditions such as date, area, meeting place, purpose, and budget. If you chose "Create your own plan," you then manually enter the location and time for each spot one by one.
- For "Create a plan (limited)" and the station/car transit modes, a dedicated screen appears before the basic conditions, asking you to choose either "Specify a station or area" or "Choose from places you want to visit."
- When adding a spot, we recommend choosing the correct shop or facility name from the candidate search. If you leave it as freely typed text, it may not be reflected in the map display or automatic travel-time calculation.
- On the Free Plan, you can select Google Maps candidates for only a single day's plan. To use map candidates for a trip spanning two or more days, you need to subscribe to the Paid Plan.
- Setting a meeting time links it to that day's notification (reminder).
Reading the results screen
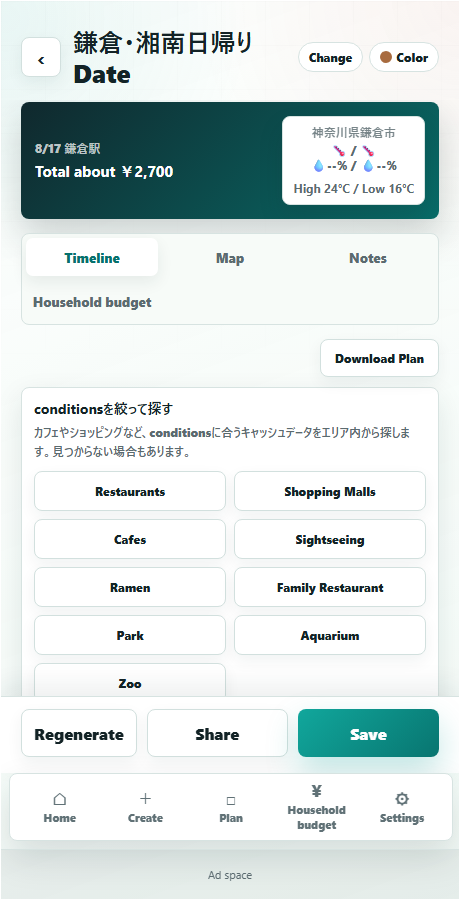
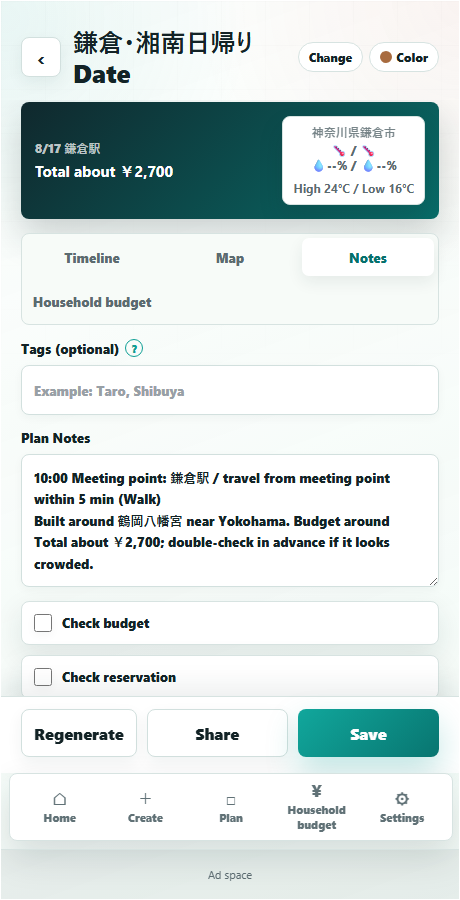
Once a plan is complete, the results screen shows three tabs: "Timeline," "Map," and "Memo."
- Timeline:Shown chronologically in visiting order, along with estimated travel time and budget.
- Map:Shows all destinations together on Google Maps.
- Memo:Record notes for the plan as a whole or for each spot, plus checklists such as things to bring.
FAQ
The candidates aren't the place I expected. Can I change them?
Yes. Tap a spot on the results screen to open its details, then use "Change location" to switch it via candidate search, a re-search with different conditions, or manual entry. See the "2. Adjusting and Saving a Plan" chapter for details.
When can I use "Create a plan from your mood (AI)"?
This feature is currently in preparation and its release date is undecided. We'll announce it in the app once it's ready.
Are created plans saved automatically?
No, you need to explicitly save from the results screen. See the "2. Adjusting and Saving a Plan" chapter for how.
CHAPTER 2
Adjusting and Saving a Plan
After creating a plan, you can change its locations, save it to look back on later, or share it with friends and family.
Changing a location
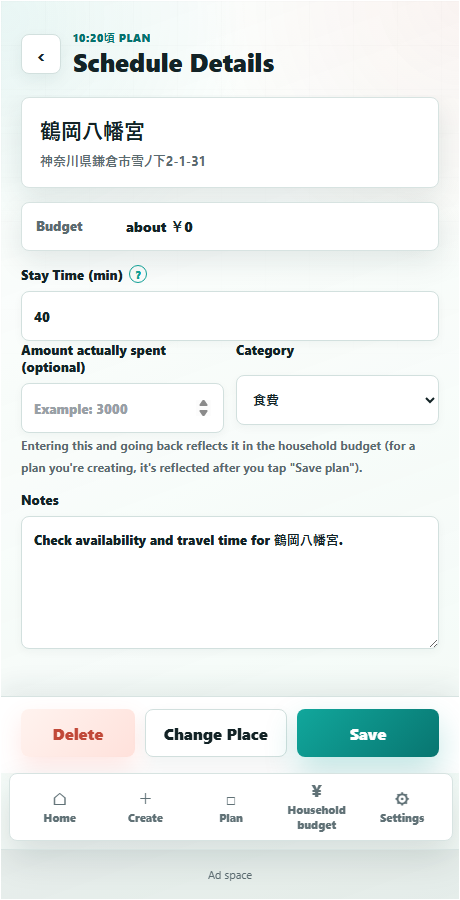
Tapping a spot on the results screen opens its details, where the "Change location" button offers 3 ways to make a change.
- Candidate search:Search by shop name or genre and choose again
- Re-search with different conditions:Change the conditions (genre, budget, etc.) and fetch new candidates
- Manual entry:Enter the address or shop name yourself
Saving a plan
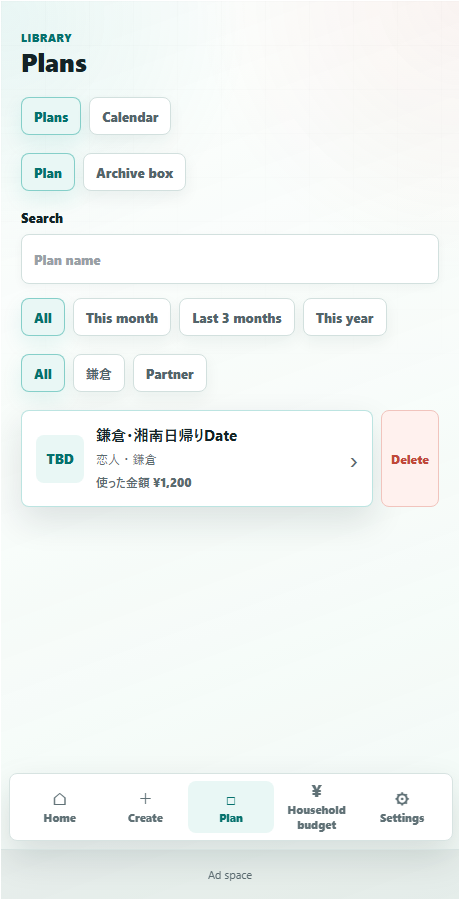
Saving from the results screen lets you look back on it anytime from "Saved Plans" or the calendar.
If another plan is already saved for the same time slot, a duplicate warning appears when saving. You can review the details and choose whether to save anyway.
Sharing a plan
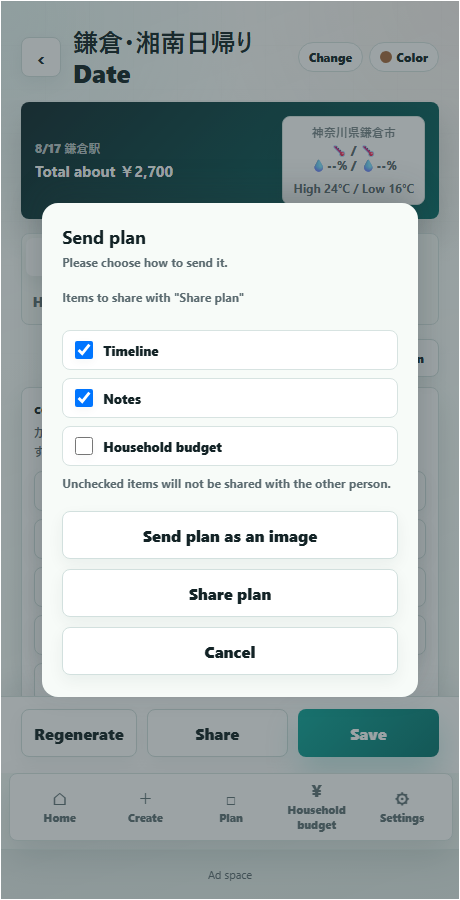
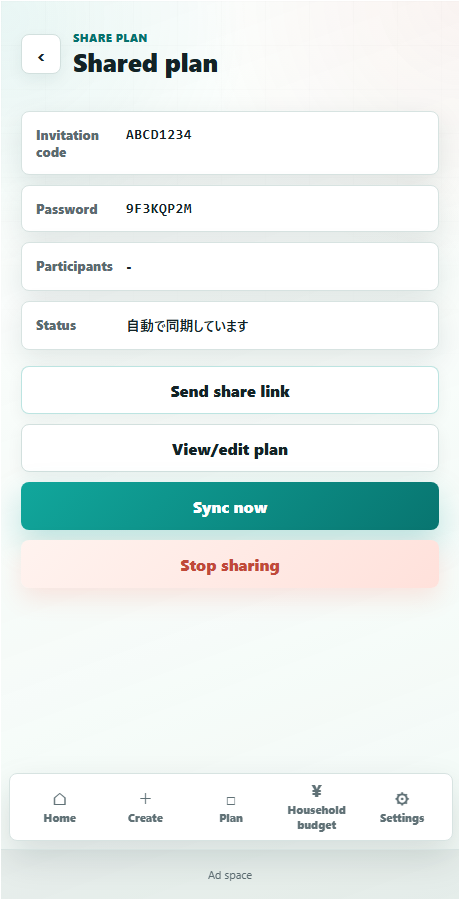
The "Share" button in the footer of the plan results screen offers 2 sharing methods.
- Send the plan as an image:Exports the timeline as a PNG image that you can send via LINE, Instagram, and more from the share sheet. The recipient can view it even without the app, but since it's an image, later changes won't be reflected.
- Share the plan (collaborative editing):An invite code and password are issued. When the other person enters that invite code and password, they receive the same plan, which then syncs automatically. Edits by either person are reflected on both screens within a few seconds.
- With collaborative editing, you can individually choose which items to share (timeline, memo, household budget) via checkboxes. Unchecked items are not shared with the other person.
- Opening a shared plan lets you resend the invite code/password or "Stop sharing" anytime from "View sharing details" in the memo tab.
- Collaborative editing is available on both the Free Plan and the Paid Plan.
Anyone who knows the invite code and password can join. Only share them with people you trust.
CHAPTER 3
Calendar
Viewing plans
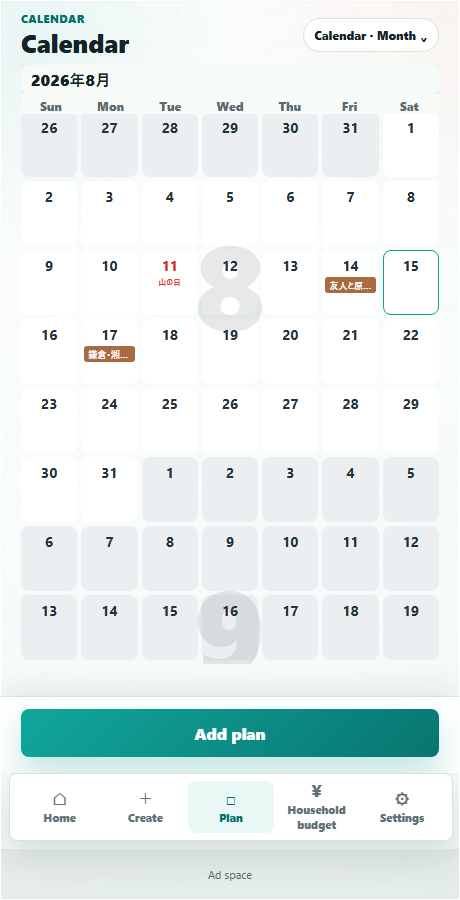
- You can switch anytime between the "Saved Plans" tab (list view) and the calendar view (month view) using the toggle at the top of the screen.
- "Add plan" on the calendar lets you start creating a plan for that date right away.
To-do list
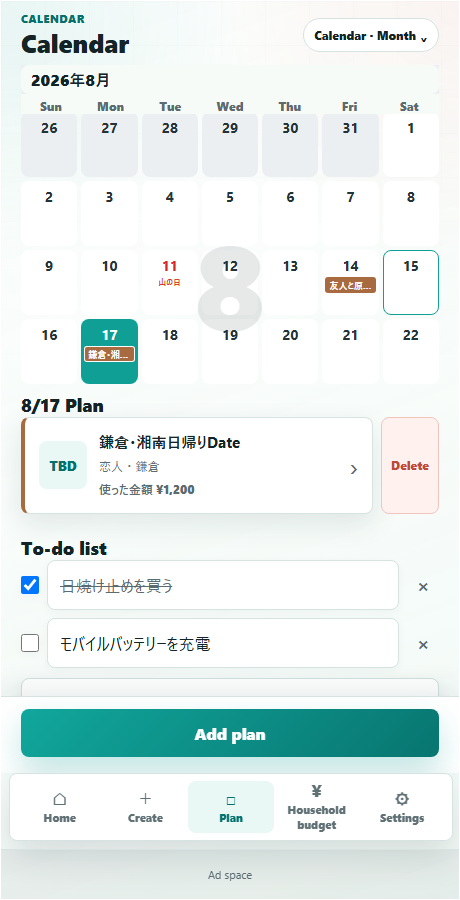
- Tapping a date on the calendar shows a "to-do list" in addition to that day's plans. You can add items per date and manage them by checking them off.
- Default items you want shown automatically every day, or on specific days of the week, can be registered in advance from "Settings › Default To-do List Items" (for example, showing "Bring in the laundry" every day).
CHAPTER 4
Household Budget
Manage your plans and your money together in one app. Record the amount you spent when saving an outing plan, and it's reflected in your household budget too.
Recording expenses and income
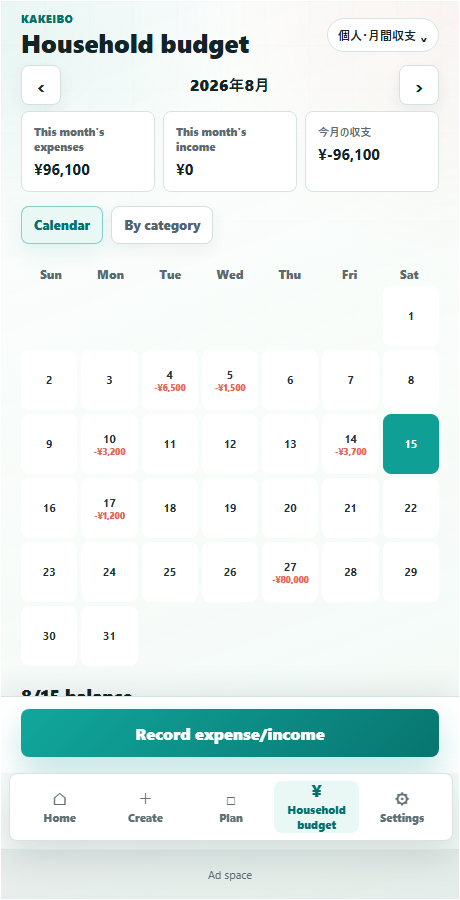
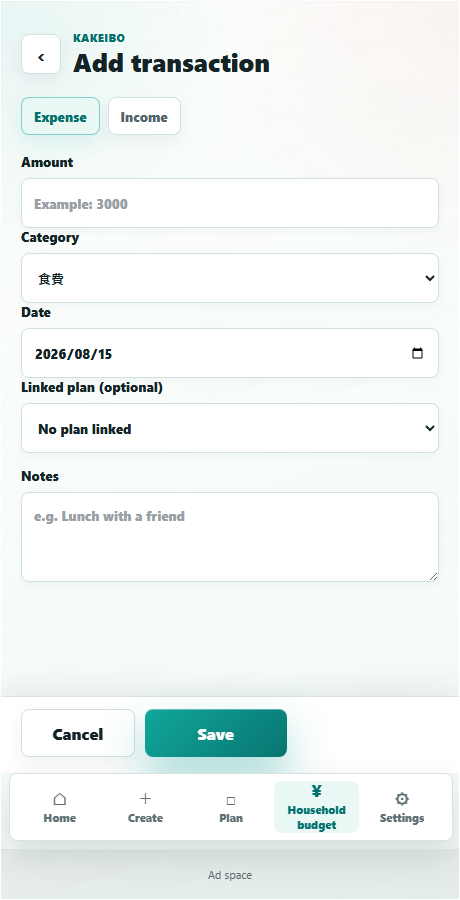
If you enter the "amount actually spent" when saving a plan, it's automatically recorded as that plan's expense in your household budget — saving you the trouble of entering it separately later.
Checking comparisons and savings
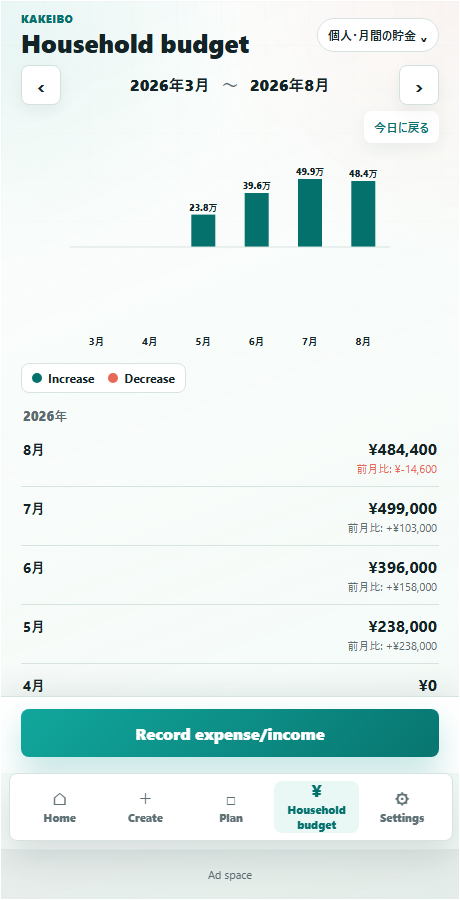
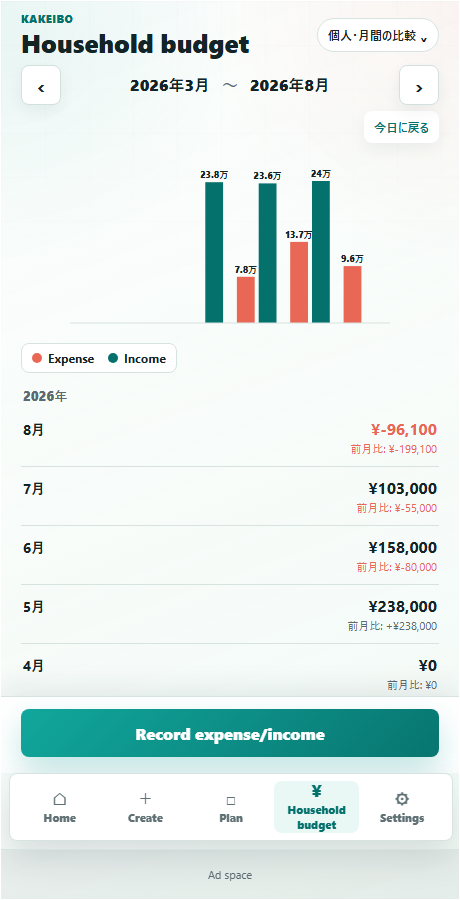
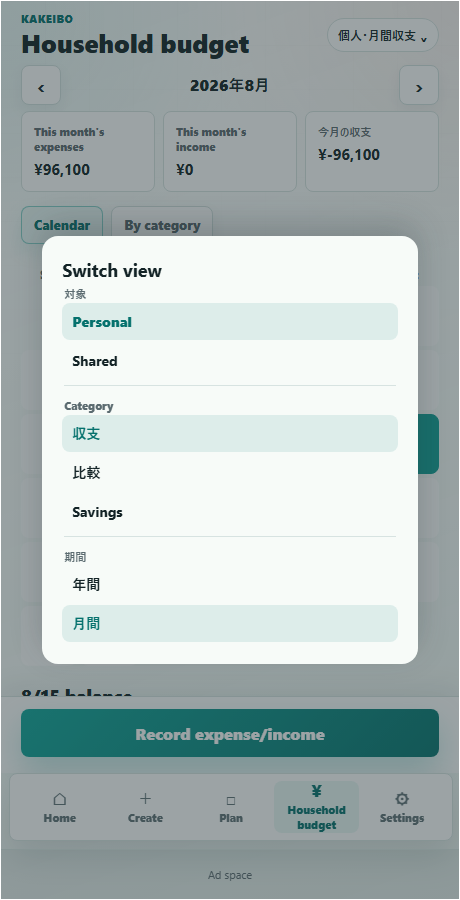
The menu at the top right of the budget screen lets you switch scope (personal/shared), item (balance/compare/savings), and period (yearly/monthly) all at once. Charts show exact amounts, and the period labels for Compare and Savings automatically follow the range currently shown.
- Use the "‹" and "›" on either side of the period to move a month or year at a time, or tap the period label to specify a range directly. After moving the range, the "Back to today" button quickly returns you to the current month or year.
- In addition to "This Month's Expenses" and "This Month's Income," the monthly summary shows a "This Month's Balance" card so you can see your balance at a glance.
Managing categories and fixed costs
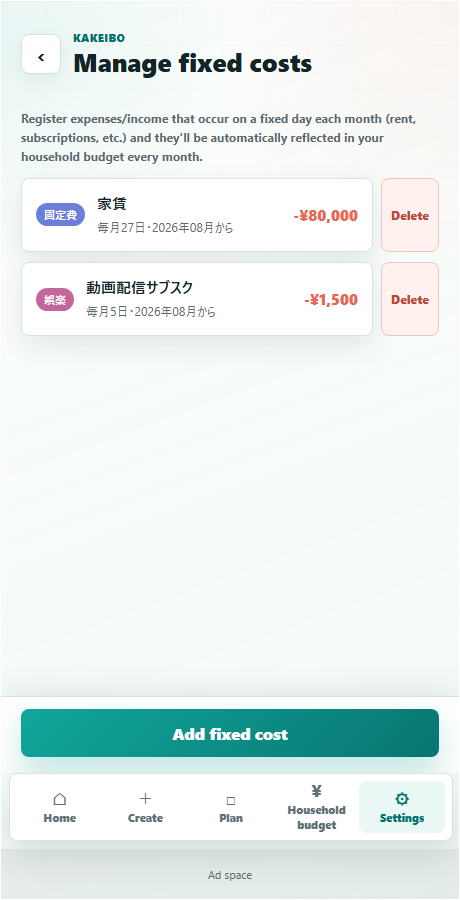
"Manage categories" and "Manage fixed costs" are found under "Settings › Household Budget."
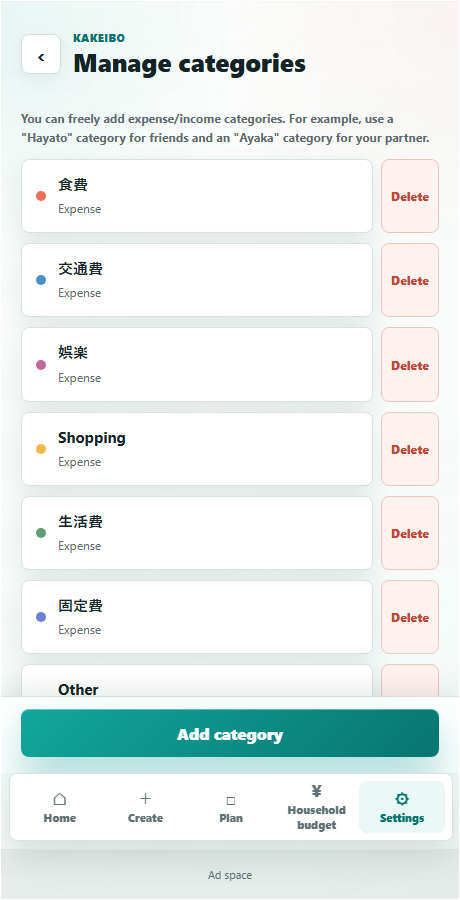
- "Manage categories" lets you freely add expense/income categories and set a monthly budget cap for each one.
- "Manage fixed costs" lets you pre-register recurring monthly expenses such as rent, phone bills, and subscriptions — registering them once saves you from entering them by hand every month.
- On the add/edit screen for a fixed cost, you can specify a "start month." That fixed cost is then reflected in your household budget starting from the specified month.
Shared budget (joint household budget)
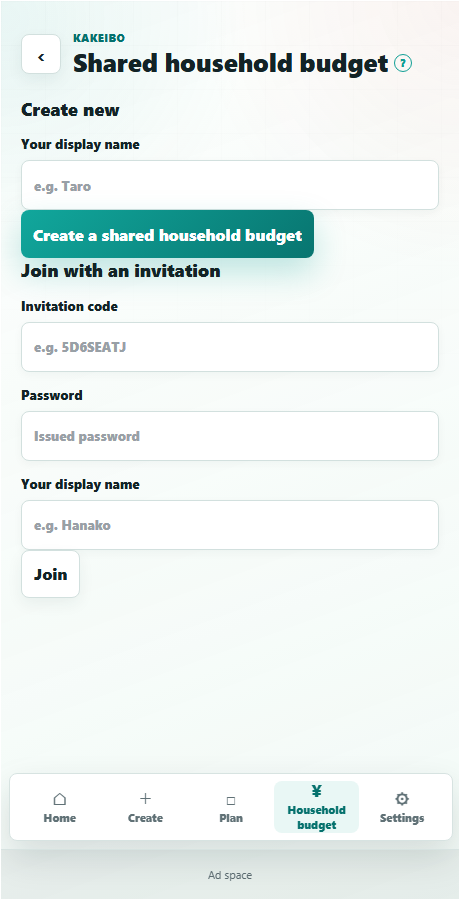
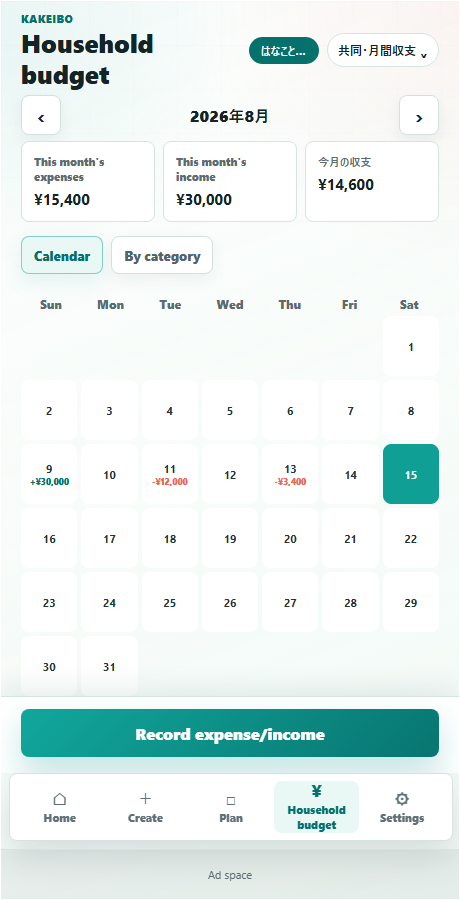
A feature that lets you share money records with one other person (you can invite up to 1 person, for 2 people total including yourself).
- Opening the menu at the top right of the budget screen and switching the scope to "Shared" brings up the shared-budget creation/join screen.
- Creating a new one automatically issues an invite code and password. The "Invite another person" button lets you send the invite code, password, and join link together via LINE, Instagram, email, and more.
- After joining, switching the scope to "Shared" in the same menu lets you record and view money spent by both of you together. Recording expenses/income, managing categories/fixed costs, and linking to plans all work the same way as your personal budget.
- Anyone who knows the invite code and password can join, so only share them with people you trust.
CHAPTER 5
Map, Weather, and Location
Map and weather basics
- The "Map" tab on the results screen shows all destinations together on Google Maps.
- The weather on the plan results screen is automatically fetched and shown to match that plan's date and location.
- Allowing location access lets you search for restaurants, cafes, sightseeing spots, and more near your current location (used by "Create a plan from your current location").
Weather on the home screen
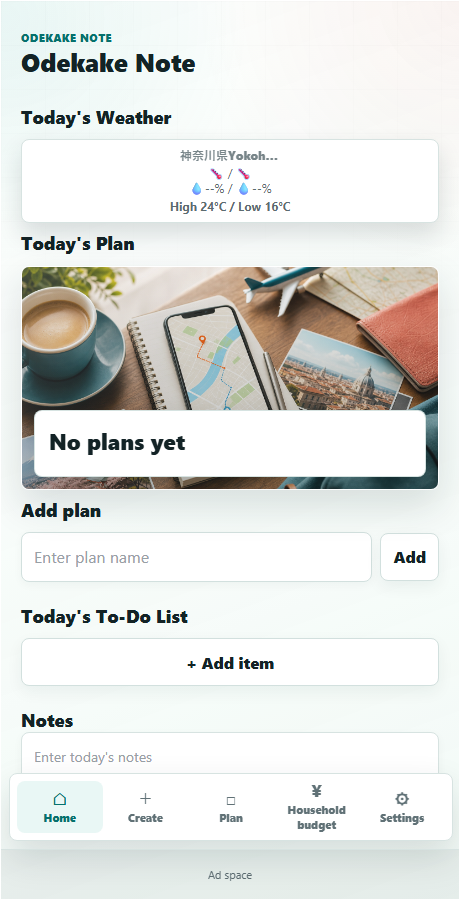
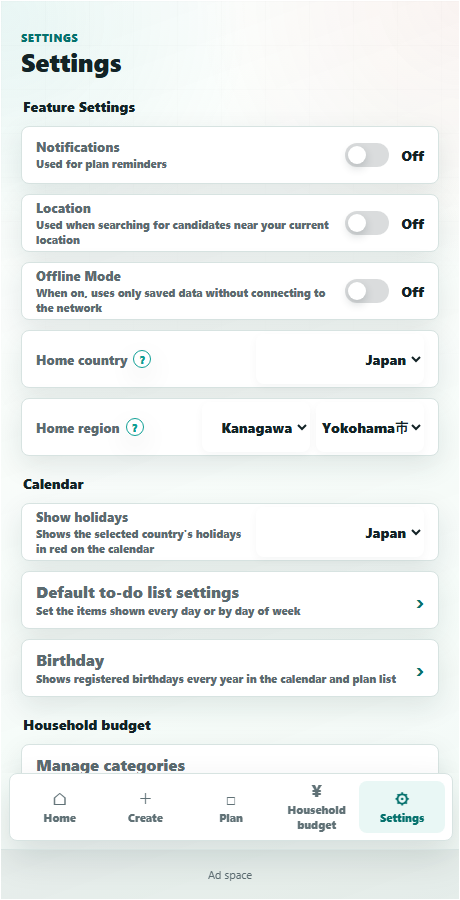
- "Today's Weather" at the top of the home screen isn't tied to a specific plan, so it shows the prefecture/city you chose in "Settings › Home Region" as the reference location.
- If your home region isn't set, the weather for Tokyo is shown.
CHAPTER 6
Using Offline
Even in areas without signal, you can use some features with pre-loaded data.
- Saved plans can be viewed even while offline.
- Features that require a connection — such as Google Maps display, candidate search, and weather retrieval — aren't available while offline. They become available again once your connection is restored.
- Of the plan-creation methods, only "Create a plan (limited)" lets you create a new plan on the spot while offline. It uses candidate data pre-loaded on your device, so no connection is needed.
CHAPTER 7
Other Features
Registering birthdays
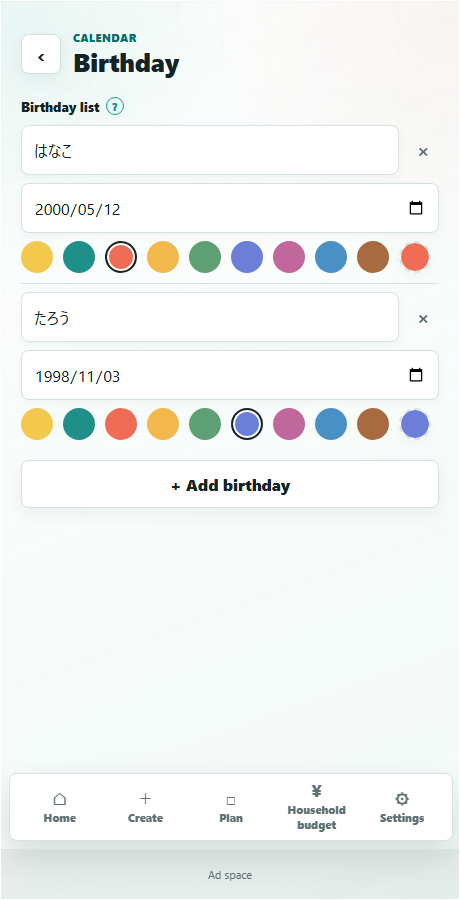
- Registered birthdays are shown automatically in the calendar and plans list every year, even across years.
- You can set a display color for each birthday, making it easy to tell multiple birthdays apart on the calendar.
- Tapping a birthday lets you record notes and a checklist just for that person (such as gift ideas).
Backup and restore
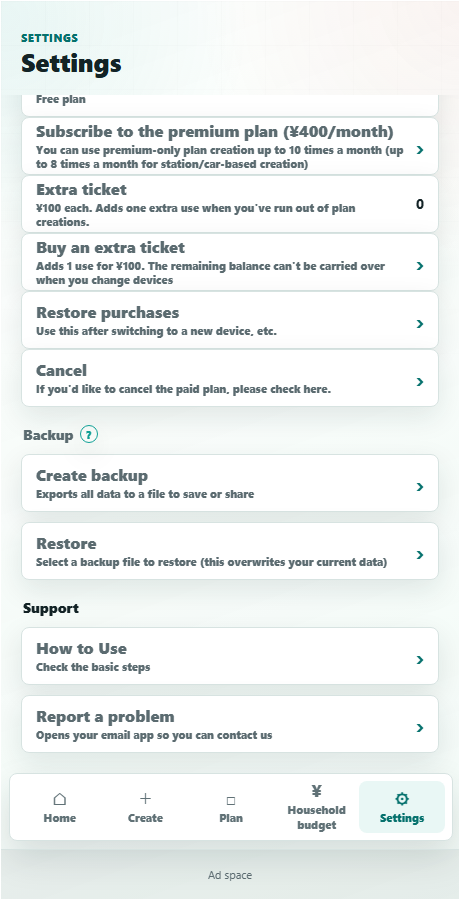
- "Create backup" lets you save or send a file via the share sheet. The exported file includes all your data — plans, household budget, calendar, and more. We recommend creating one before switching devices or reinstalling the app.
- Choosing "Restore" and selecting a saved backup file restores its contents. Note that this overwrites the app data in place at the time you run it.
- Backup and restore cover data only (plans, household budget, settings). Paid Plan subscription status isn't included, so after switching devices, separately restore your subscription from "Settings › Paid Plan › Restore Purchases."
Running "Restore" overwrites the data in place at that time. If needed, back up your current data first for peace of mind.
CHAPTER 8
About Plans
What you can do on the Free Plan
- Use 2 creation methods (Create your own plan / Create a plan (limited)).
- Available offline (Create a plan (limited), and viewing saved plans).
- Notifications remind you so you don't forget a plan.
- Create plans linked to Google Maps (for a single day's plan only).
- A pre-visit checklist is created automatically for each plan.
- Manage plans and a to-do list together in the calendar.
- Record expenses and income in the household budget, managing money alongside your plans.
- Create up to 20 plans per month (combined total for Create your own plan / Create a plan (limited)).
- An ad is shown each time you create a plan.
What you can do on the Paid Plan (¥400/month)
- Ads are no longer shown.
- 2 additional creation methods (Create a plan from your current location / Create a plan (by station/car)).
- The 2 additional methods can be used up to 10 times per month combined (of which Create a plan (by station/car) is limited to 8 times on its own). Even after reaching the limit, you can keep using them with extra tickets (¥100 each).
- Create your own plan / Create a plan (limited) can be used without limit (no 20-per-month cap as on the Free Plan).
- No limit on the number of days for linking Google Maps, even for multi-day plans.
The Paid Plan is an auto-renewing subscription billed at ¥400/month (tax included). The purchase amount is charged to your Apple ID account, and unless canceled at least 24 hours before the end of the period, it renews automatically at the same price. You can cancel from "Settings › (your name) › Subscriptions." For details, please check the Terms of Service・Privacy Policy.
Plan comparison
| What you can do | Free Plan | Paid Plan |
|---|---|---|
| Available creation methods | 2 | 4 |
| Ads shown | Yes | No |
| Monthly count for manual/limited creation | Up to 20 combined | Unlimited |
| Monthly count for current-location/station-car | Not available | Up to 10 combined per month (station/car limited to 8 on its own) |
| Multi-day Google Maps linking | 1 day only | No day limit |
| Price | Free | ¥400/month |
"Create a plan from your mood (AI)" is currently in preparation and is not available on either the Free Plan or the Paid Plan.
FAQ (Paid Plan)
How do I subscribe to the Paid Plan?
You can subscribe to the ¥400/month subscription from "Settings › Paid Plan › Subscribe to Paid Plan." Payment is processed through the App Store / Google Play.
How do I cancel the Paid Plan?
There is no cancel button within the app. On iPhone, cancel from "Settings › (your name) › Subscriptions"; on Android, cancel from "Payments & subscriptions" in the Google Play app. Even after canceling, you can keep using Paid Plan features until the period you already paid for ends.
What's the difference between the Free Plan and the Paid Plan?
See the comparison table above. The main differences are whether ads are shown, the number of available creation methods, the monthly usage limit, and multi-day Google Maps linking.
What are extra tickets?
Tickets that let you add one more use of "Create a plan from your current location" or "Create a plan (by station/car)" for ¥100 each, once you've reached your monthly limit. They have no expiration date and carry over until used.
How do I restore my purchase?
After switching devices or reinstalling the app, you can restore a previously purchased subscription from "Settings › Paid Plan › Restore Purchases." Already-used extra tickets are not restored.
Can I try Paid Plan features right after installing?
There is currently no free trial right after installation. To use Paid Plan features, please subscribe from "Settings › Paid Plan › Subscribe to Paid Plan."
What counts toward the Free Plan's 20-per-month limit?
The combined total of "Create your own plan" and "Create a plan (limited)." The Paid Plan is not subject to this limit and can be used without restriction.
Is there a usage limit even on the Paid Plan?
"Create a plan from your current location" and "Create a plan (by station/car)" are limited to 10 times per month combined (of which Create a plan (by station/car) is limited to 8 times on its own). Even after reaching the limit, you can keep using them with extra tickets. Other creation methods (Create your own plan / Create a plan (limited)) are unlimited.
Can I use Paid Plan features offline?
Features that require a connection (searching from your current location, Google Maps, weather, etc.) are only available online. Offline, you can only view saved plans and use "Create a plan (limited)."
Last updated: August 15, 2026 / Contact: odekakenote.daisuke@gmail.com